

I have been getting some PM's asking how to disable the anti dive valve, so I thought I would share this with the class.
![Image]()
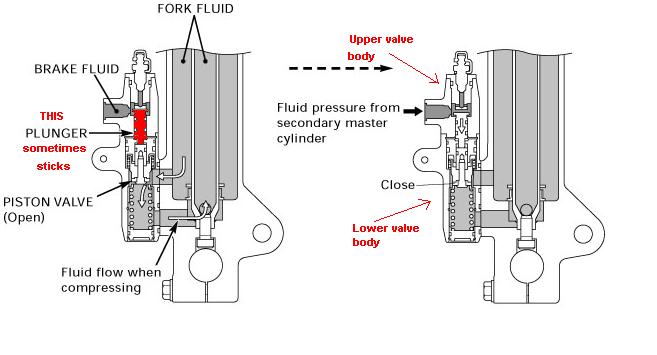
If you want to totally disable the anti-dive, you need to separate the upper and lower halves of the anti-dive valve by about 1/4 inch. All you need to do is loosen the two allen bolts that hold the two halves together, and put something between them (washer? large O ring? nickel with a hole drilled in it?) to hold them apart a bit, and then put it back together.
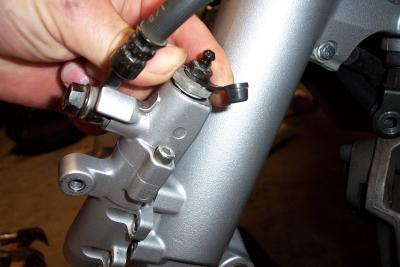
In this (out of focus) picture, you can see the two halves separated. After you separate them, when you look at the bottom side of the top half you will see a small black piece sticking out of the bottom. This is the plunger that moves to activate the lower valve. All you are trying to do is prevent that plunger from activating the valve in the lower half of the body.
![Image]()
Some folks have just ground off about 1/4 inch or so off the black plunger that sticks out the bottom of the top half of the valve, though I don't really like that approach, since it is more permanent and means you would have to replace the upper assy to undo it. However, this approach is an easier fix, as all you do is grind or hack off the bottom of the plunger and reassemble. If you don't mind making it a permanent modification, then this is probably the simplest way to disable it.
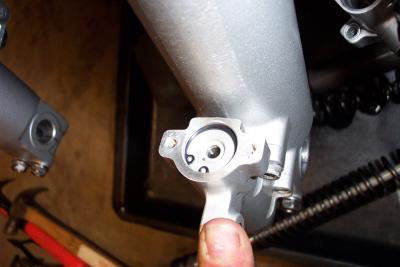
Here you can see the top half of the valve is removed, and you are looking at the lower portion of the valve still attached to the fork leg.
![Image]()
Do not remove the lower portion of the anti-dive valve from the fork leg. If you do, all the fork oil will come out.
The other method I have employed with some sucess is instead of totally disabling the valve, just removing the pre-load that the upper valve puts on the lower valve when at rest. To do this, all you have to do is back off the large bolt assy that the bleeder valve is screwed into by ONE revolution (and only ONE). Then insert some sort of shim or washer to tighten it back down on. When you are done, the bleeder valve assy should be backed off one revolution. This will remove all the pre-load, but will still leave the anti-dive valve functional.
![Image]()
![Image]()
![Image]()
More photos here:
http://www.pbase.com/fredharmon/antidive
If you want to totally disable the anti-dive, you need to separate the upper and lower halves of the anti-dive valve by about 1/4 inch. All you need to do is loosen the two allen bolts that hold the two halves together, and put something between them (washer? large O ring? nickel with a hole drilled in it?) to hold them apart a bit, and then put it back together.
In this (out of focus) picture, you can see the two halves separated. After you separate them, when you look at the bottom side of the top half you will see a small black piece sticking out of the bottom. This is the plunger that moves to activate the lower valve. All you are trying to do is prevent that plunger from activating the valve in the lower half of the body.

Some folks have just ground off about 1/4 inch or so off the black plunger that sticks out the bottom of the top half of the valve, though I don't really like that approach, since it is more permanent and means you would have to replace the upper assy to undo it. However, this approach is an easier fix, as all you do is grind or hack off the bottom of the plunger and reassemble. If you don't mind making it a permanent modification, then this is probably the simplest way to disable it.
Here you can see the top half of the valve is removed, and you are looking at the lower portion of the valve still attached to the fork leg.
Do not remove the lower portion of the anti-dive valve from the fork leg. If you do, all the fork oil will come out.
The other method I have employed with some sucess is instead of totally disabling the valve, just removing the pre-load that the upper valve puts on the lower valve when at rest. To do this, all you have to do is back off the large bolt assy that the bleeder valve is screwed into by ONE revolution (and only ONE). Then insert some sort of shim or washer to tighten it back down on. When you are done, the bleeder valve assy should be backed off one revolution. This will remove all the pre-load, but will still leave the anti-dive valve functional.


More photos here:
http://www.pbase.com/fredharmon/antidive